Showing posts with label Peanut Free. Show all posts

Friday, March 14, 2014

Yoga Renewal

photo(30)


As of today, I've made the decision the get back into daily yoga. Since I practiced gymnastics for most of my childhood, I took an interest in yoga to increase my flexibility even further.  But I quickly found that it has far more benefits than just learning how to become a human pretzel.  Aside from fixing my posture (I have a bad and lasting back injury from gymnastics), I feel much more grounded, present and calm after a session which helps immensely with occasional food allergy anxiety.  While recovering from severe reactions, I used root myself in a downward dog pose to calm myself. That moment when you're slowly sinking into the mat and you can almost feel the earth move as it ticks around the sun...indescribable healing.  I am more than ready to return to it.


photo(29)


-my morning meditation in child's pose-


Here are a few good links for beginners to yoga:


  1. 5 types of Yoga to try now

  2. 3 Yoga Poses to Help Anxiety

  3. 5 Common Yoga Mistakes Beginners Make

  4. 8 Yoga Poses for Better Digestion


What kind of yoga do you practice?


What are your favorite poses, tips and yoga tricks?

Sunday, January 5, 2014

2014 New Year, Fresh Start

photo(23)

Happy New Year!

For me, 2013 was the year of growth and challenges. I made the decision to pursue my passion for nutrition through graduate school which was an entire gear switch from my undergraduate studies. It was challenging to become a scientist after political and linguistic focus and I admit I was not fully prepared for the onslaught of organic and biochemistry. But it remains one of the best choices I have made for myself and I'm proud of what I accomplished in one year's passing. I've learned a vast amount, and I simply cannot put a price on that.

With the turn of the new year, I carefully sculpted out my new goals and aspirations which erupted in a buzzing excitement and personal drive that I suspect will not wane anytime soon. One of my biggest changes implemented is to get back to the very basics of a healthy lifestyle. After some bouts with systemic inflammation, psoriasis, and regularly consuming too many processed foods, I knew I was drifting a substantial distance from my personal ideals about food and nutrition. This year, I've begun a healing, anti-inflammatory plant based diet that has already done wonders for my small spots of psoriasis (they've all but disappeared after not budging for a few weeks). My overall health plan, in five points:


  • More vegan dishes, mainly plant based diet
  • Little, to no meat and dairy, moderate fish intake.
  • Very limited processed food products and refined sugar
  • Weekly Yoga, meditation, and positive affirmations
  • No alcohol consumption, save special occasions

I've been in the kitchen doing some mad-science (cooking and making massive messes) and am excited to share my new approach to whole nutritious plant foods with all of you. Additionally, I've received many kind emails and comments regarding the blog that have really reignited the spark for fresh new content. I want to thank each and every one of you for the support and love you have shown me--I appreciate you all very much and thank you for your patience on the downtime during my studies. An inspiring quote I came across that I find potent and vital to remember this year: "Never be ashamed of a scar. It simply means you were stronger than whatever tried to hurt you." - Unknown. Remember that only you have the power to make your year the year you wish it to be. With love and health, I wish you a happy and extraordinary 2014.

Saturday, November 17, 2012

My Allergy Friendly Kitchen


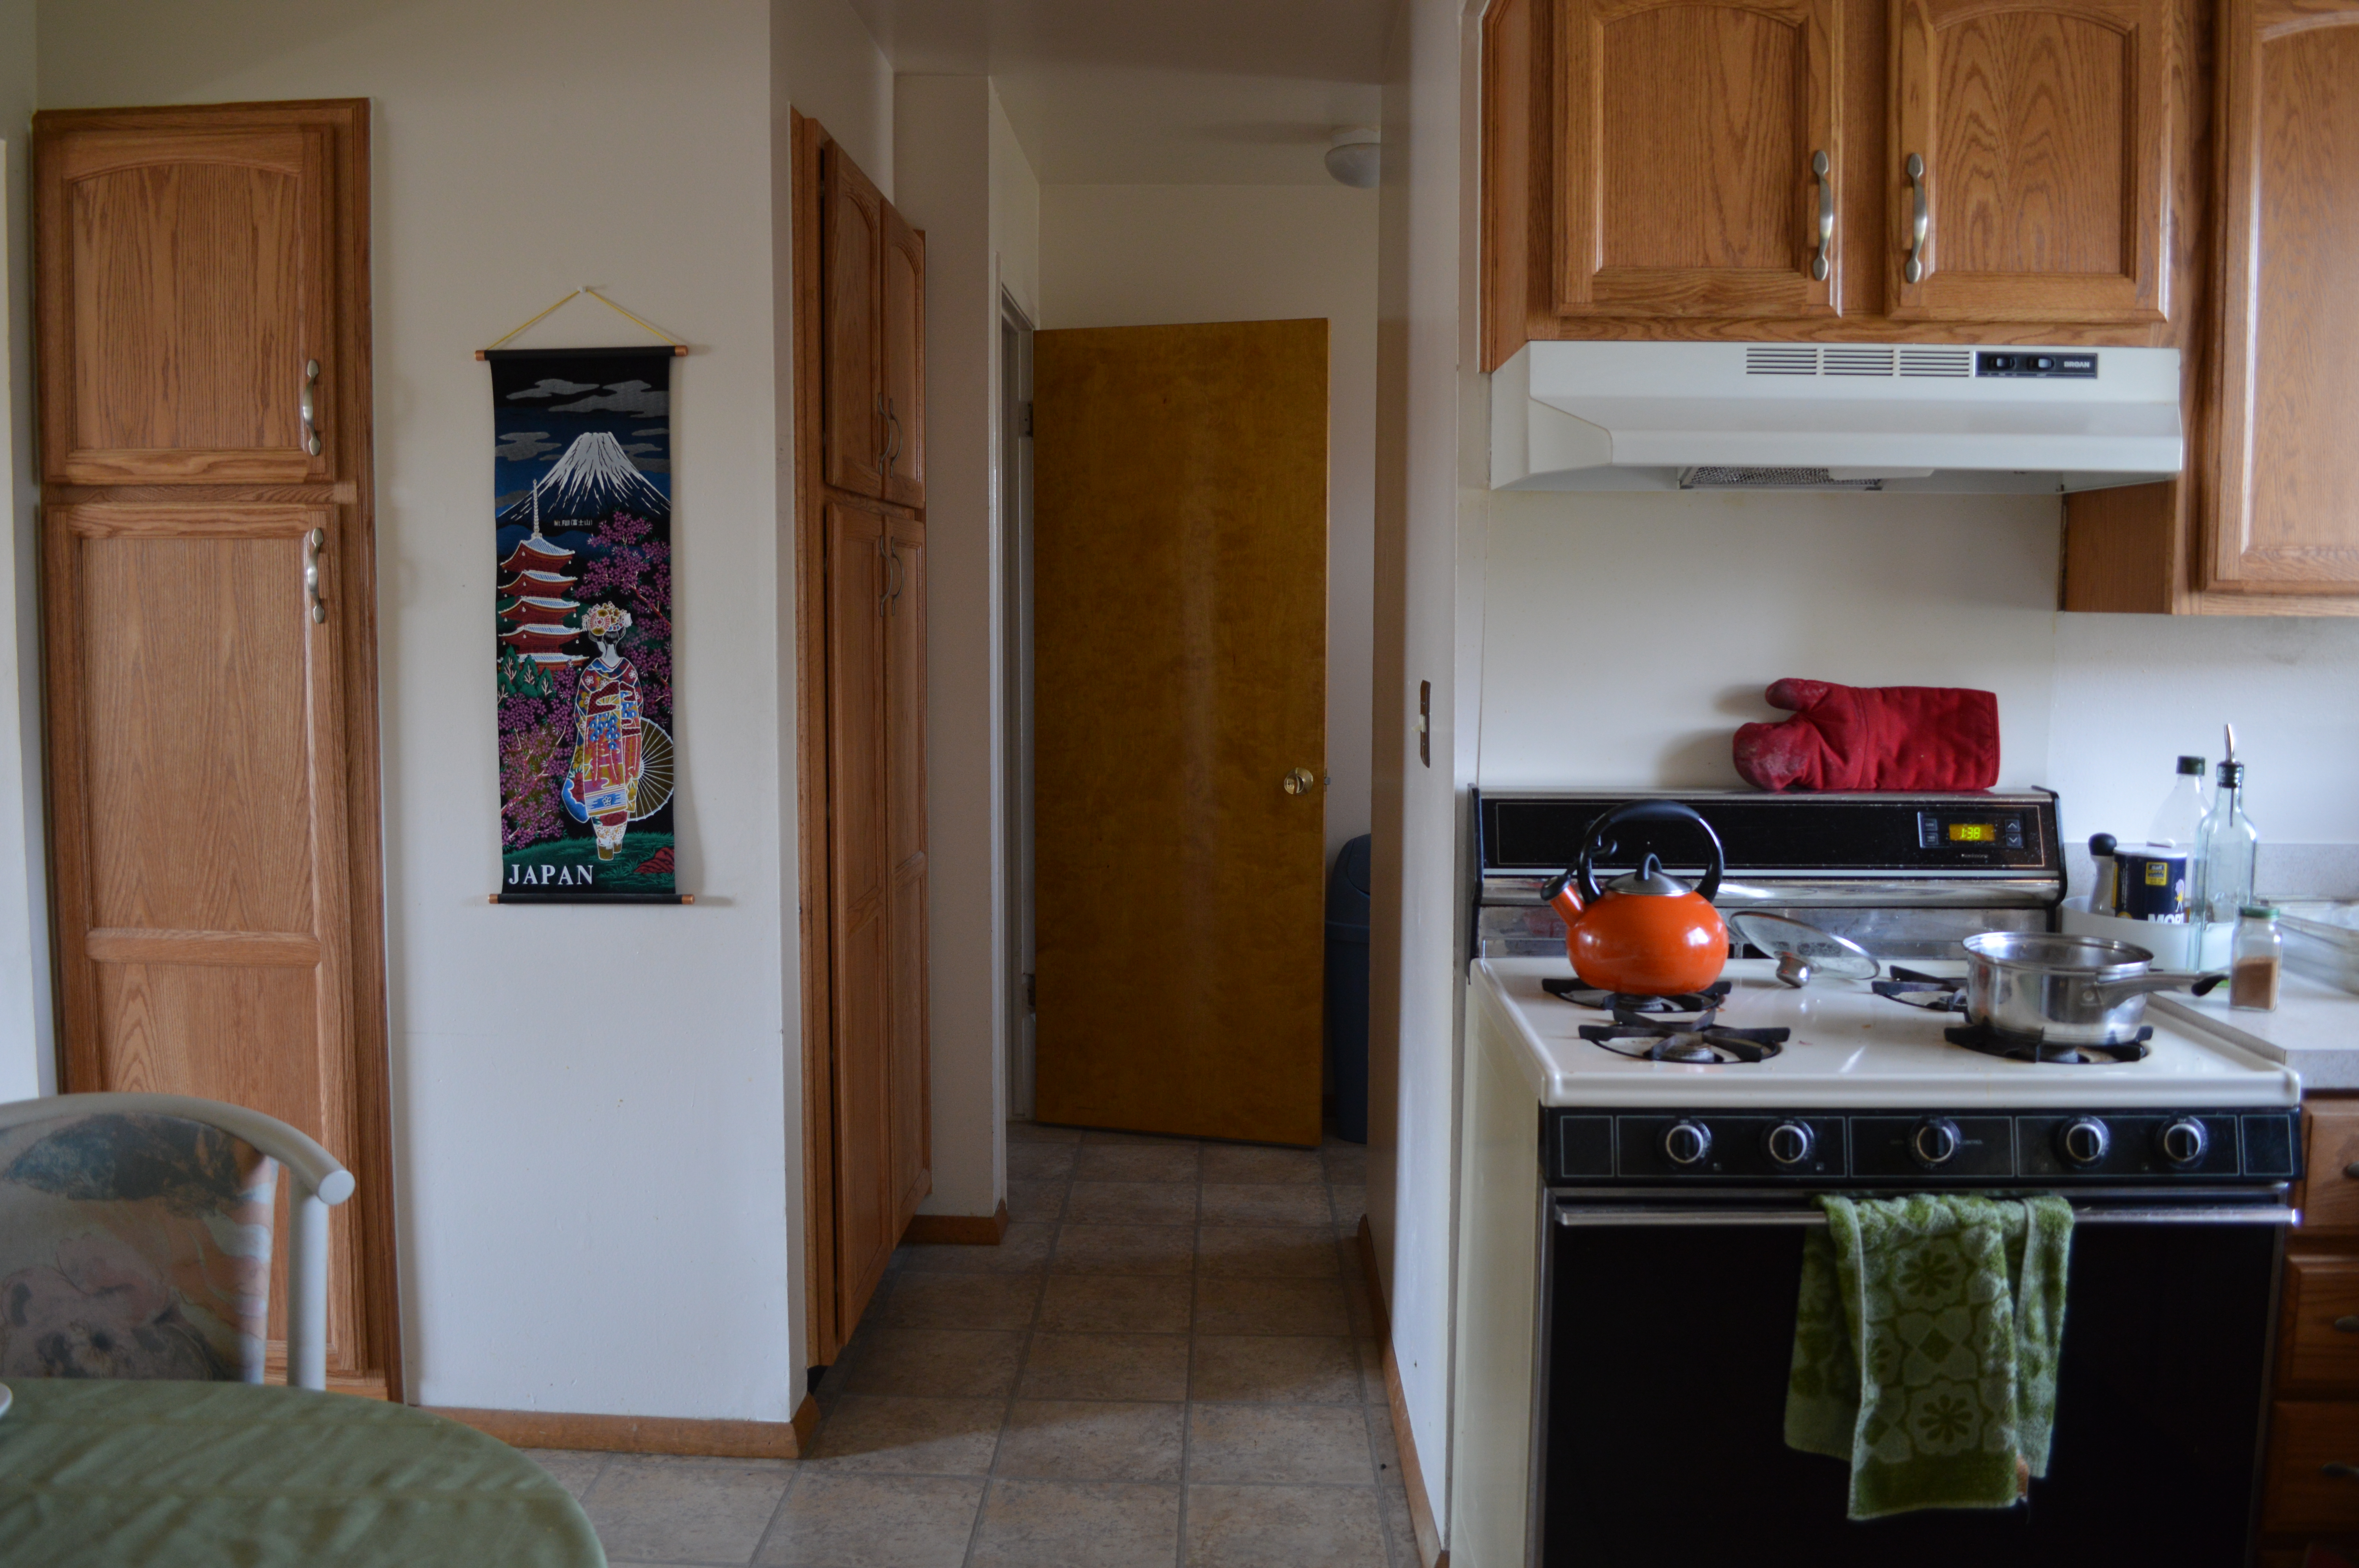
I'm lucky to have a mostly dedicated gluten-free kitchen, thanks to the help of my boyfriend, who isn't exclusively gluten-free. He's a kitchen whiz and a fast learner. Sometimes I think he knows how to handle my allergies better than I do. So when we're at home, this is where the magic happens. I happily spend most of my time in this room. Some readers have been asking about how I keep my kitchen functional and allergy friendly at the same time so I decided to give everyone an inside look at the staples, setup, and equipment that are always in my kitchen.


Left to right: Centrifugal juicer, Sodastream Maker, Black & Decker High Speed Blender

 We set up an exclusive beverage station since raw juices, smoothies, seltzer water, and homemade soda are constantly happening in our kitchen. Instead of coffee, we down a large glass of green veggie juice or a fruit and veggie smoothie which I feel is even more energizing than a large cup of joe. The vitamins hit your system immediately and alkalize on the way. What better way to start the day?

A wide variety of spices are always on hand in my kitchen. My parents are big on bold flavors and it definitely rubbed off on me. No matter how simple a dish, you can always spark it to life with a good combination of herbs and spices.


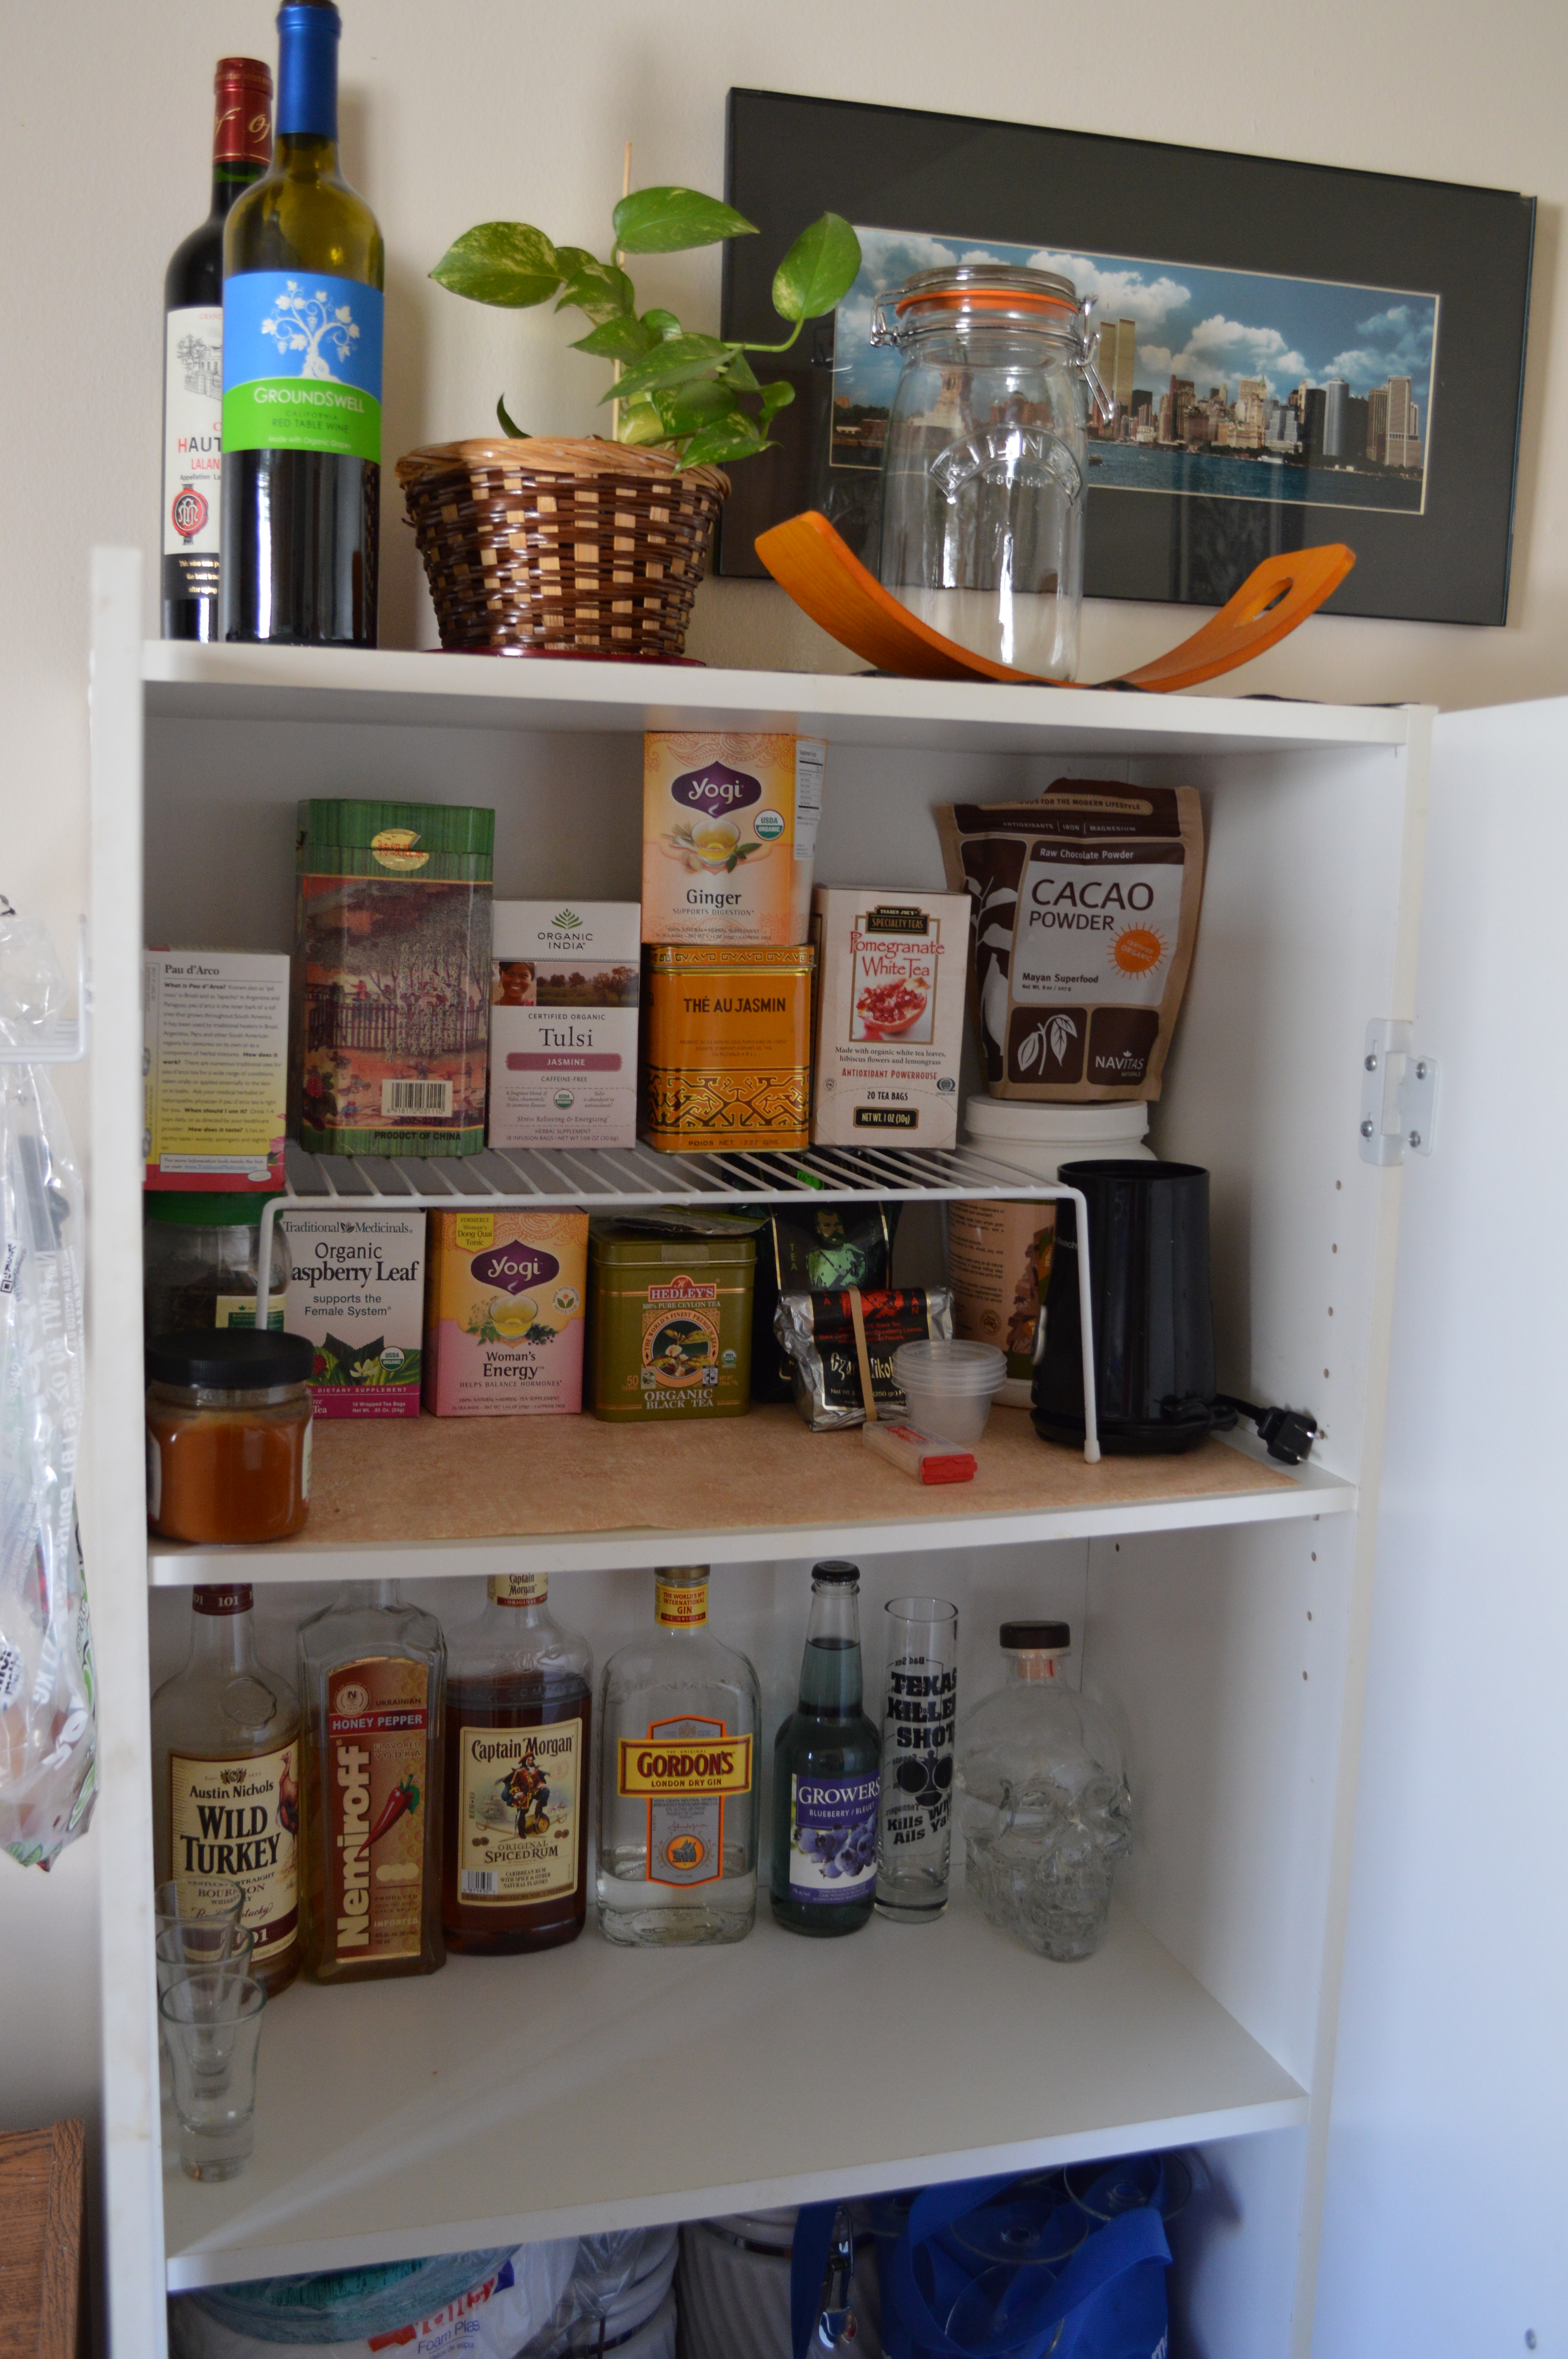
I love that most herbal tea is naturally allergen free and gluten-free. Our tea and bar cabinet is a great addition to keeping things organized. Some of the liquors on the bottom are exclusively Y's since we haven't checked the whiskey for gluten content yet (please excuse the Wild Turkey...) My staples include a good organic red wine, chamomile, pau D'arco, some Yogi teas, and all Traditional Medicinal teas.


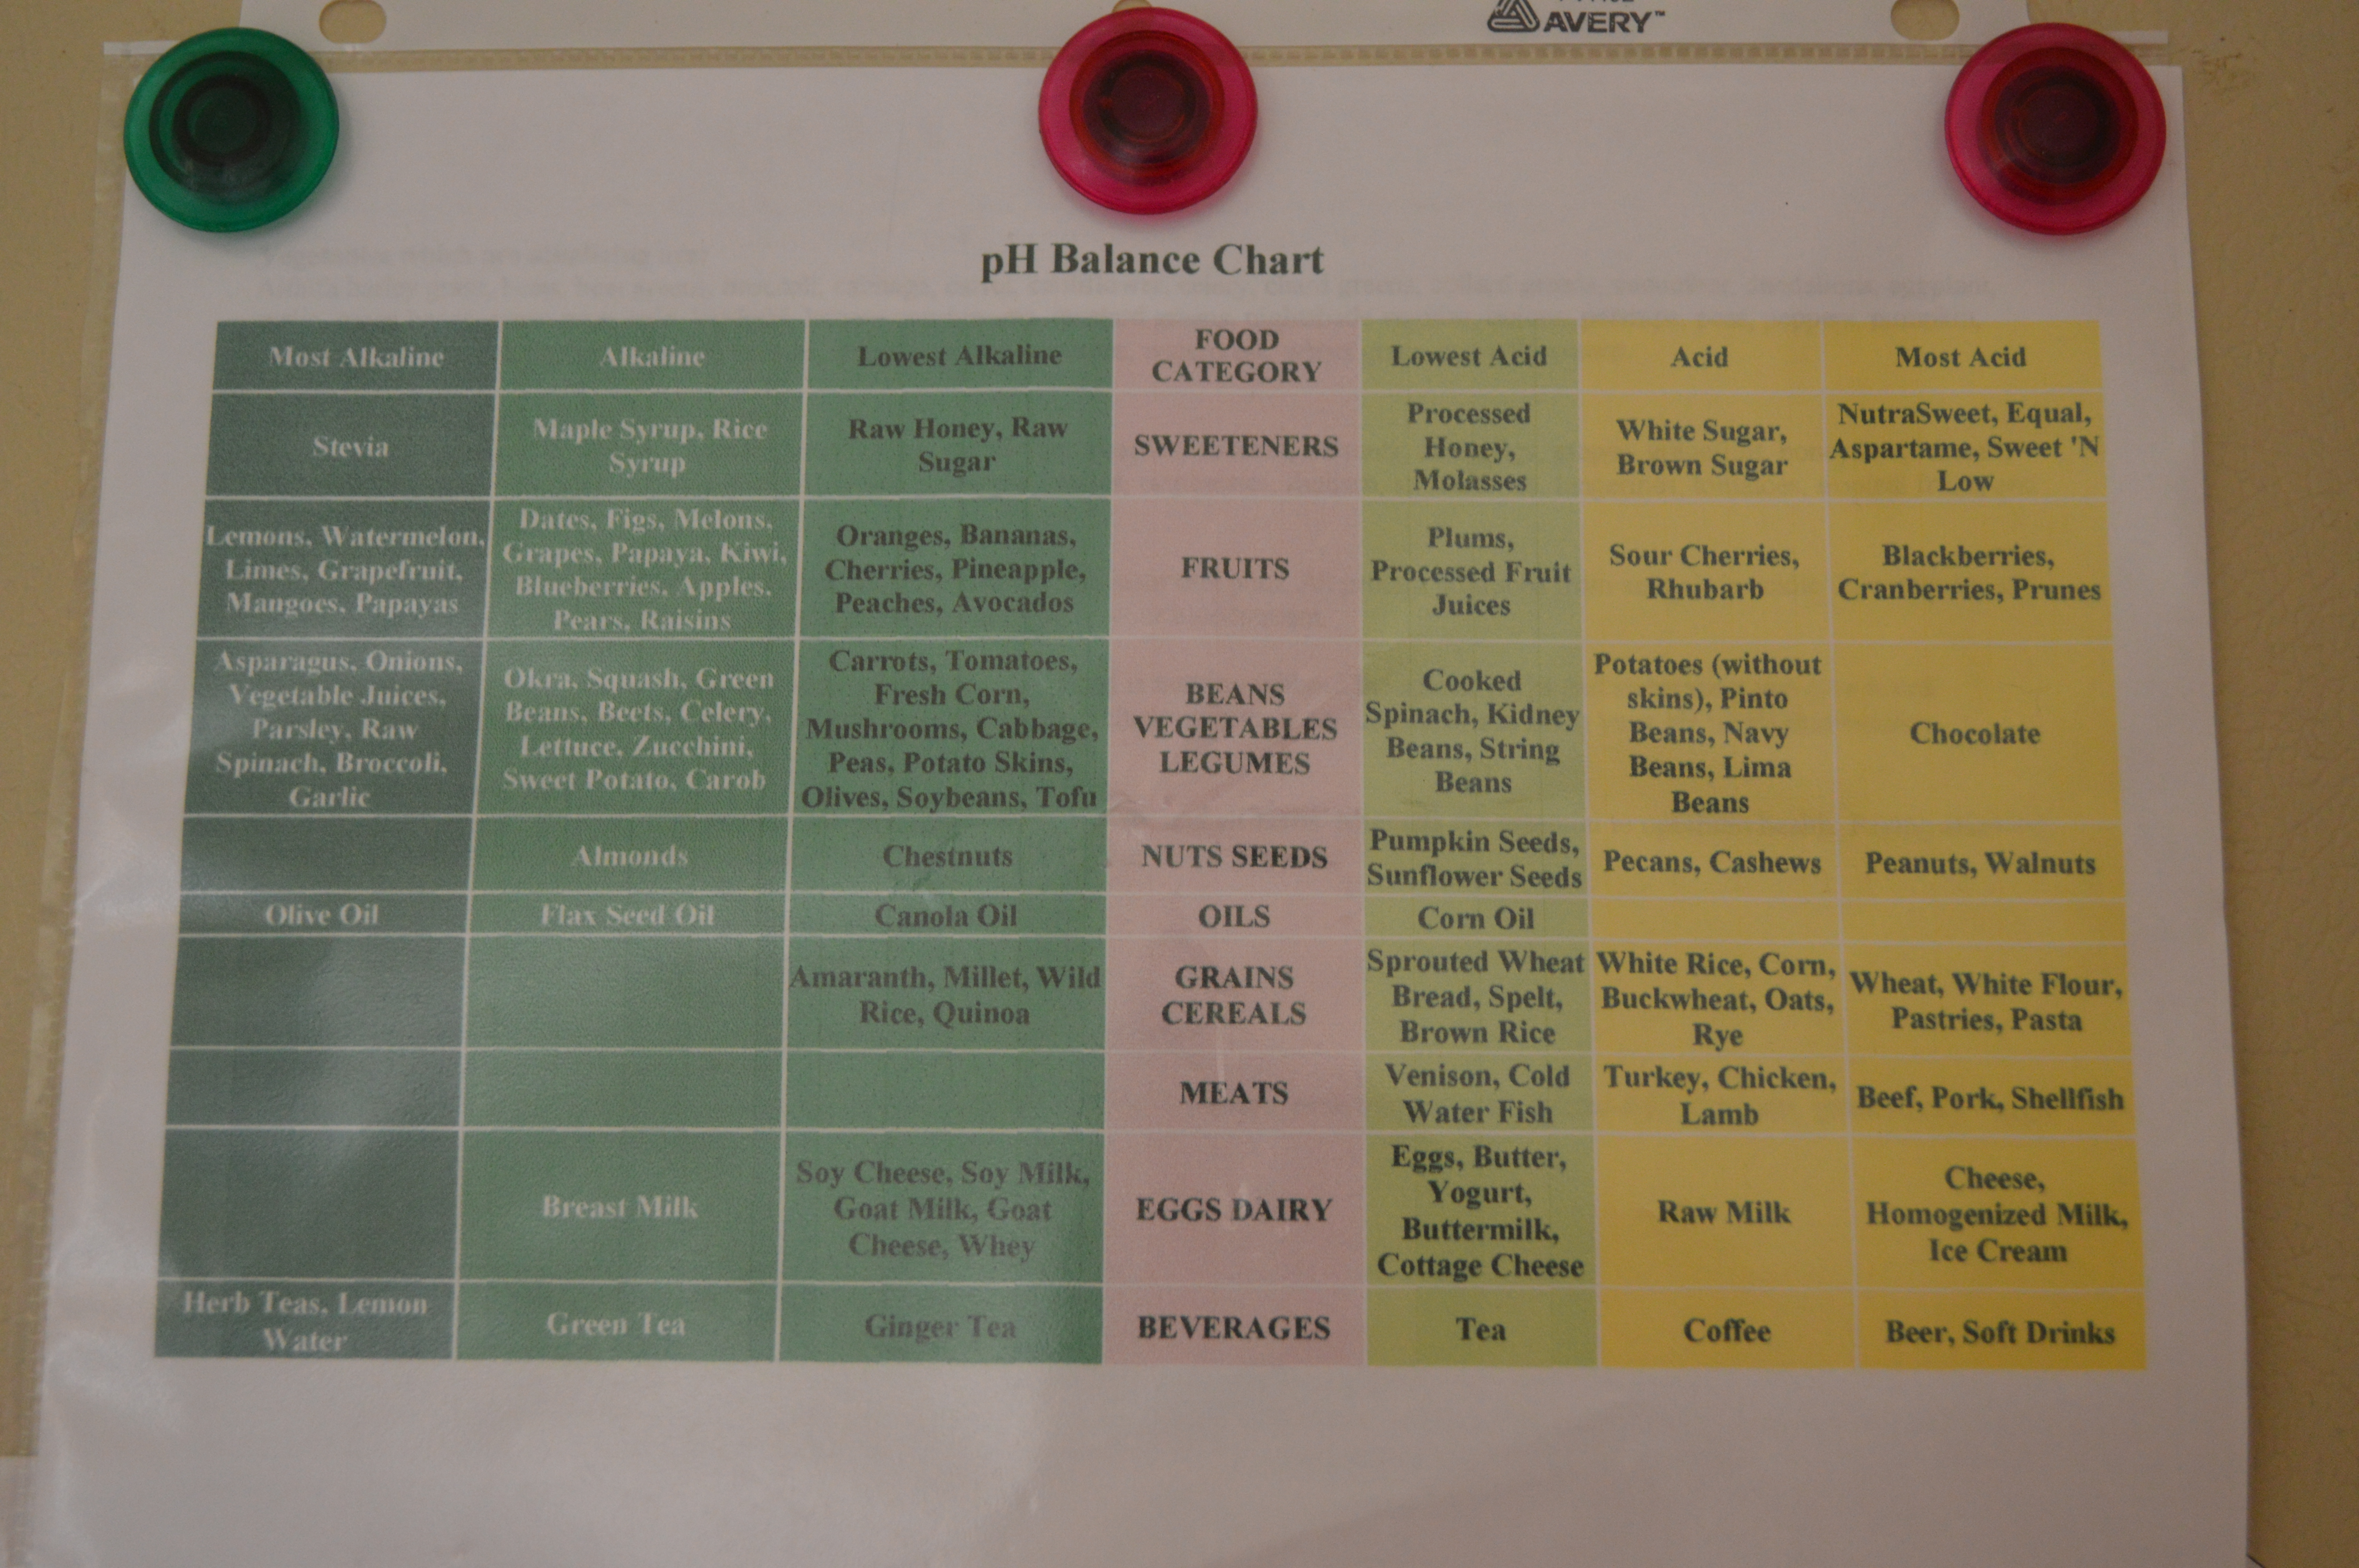
Fridge magnets hold up our Ph balancing chart, which is a basic breakdown between some highly alkaline and highly acidic foods. I believe a slightly alkaline body is a healthy goal to shoot for, so we try to minimize our intake of highly acidic foods. We usually eat meat 1 to 2 times a week and always have vegetables and greens on hand via juices, smoothies, sautes, and more. Low glycemic fruits such as berries and apples are also a staple on the menu.


Some of my favorite flours/gluten-free grains to cook and bake with are quinoa, millet, buckwheat/buckwheat flour, almond Flour, hazelnut flour, brown rice flour, coconut flour, corn meal.

Staples in the pantry: Black rice, brown rice, wild rice, Tinkyada brown rice pasta, canned olives, canned pumpkin, coconut milk, raw nuts and seeds, Terra sweet potato chips, almond milk, xylitol, coconut sugar, agave nectar, coconut oil, olive oil, Namaste foods mixes, King Arthur gluten-free mixes, Enjoy Life snacks and more.


Many meals are happily shared here (but no "Happy Meals" mind you!) If any soy or gluten does make it's way into the kitchen on occasion, we have dedicated dishes and pans for keeping things segregated.


Our kitchen has lovely natural light that I love utilizing in my photography. At the end of the hallway, it takes a right towards the backdoor which leads out to one of our mini gardens...


And what would a gluten-free, allergy friendly kitchen be without a raw produce section on hand? We call it the farmacy. It's getting cold out, but our mighty kale is still standing strong. The flavors of fresh produce and herbs is truly incredible and I'm lucky to walk out my door to have my pick. I hope you enjoyed the inside look!

~~~~~~~~~~~~~~~~~~~~~~~~~~~~~~~

Friday, October 26, 2012

A Little Something about Health Investment

 
This squirrel sincerely thinks it's our pet. I've now become the mother of squirrels, which obviously is not as cool as being the khaleesi with dragons. Complete with running up to the door and waiting for us to come out with sweet nuts and sunflower seeds. This guy knows how to get good (and free) nutrition!

There was a time in my life when I didn't know how to effectively love and treat my body. Before going gluten-free, I was sick to the point where I stood 5 feet 4 inches tall and weighed in at only 94 pounds due to malnutrition. After diagnosis, I returned to a healthier weight until the diagnosis of my other food allergies (including soy and peanuts). The funny thing is, even now as I'm getting back up to my ideal body weight, I'm more confident in how I see my body and how I treat it. Ironically, I have living gluten-free and food allergies to thank for it. These are the things that finally taught me how to live and live well.

Getting diagnosed with everything that I have has made me realize how important it is to learn to fill your body with real healing nutrition. I can honestly say that when starting out gluten-free, I probably set myself back even further by attempting to "replace" all the foods I thought I had lost forever--trans fats, overly processed foods and all. I had no idea how to eat before my diagnosis and certainly didn't know how to eat just after either. Slowly, I learned to listen to my body and turn away from flashy advertising for convenient processed foods. Do I swear off all of it? No. But I do know how to see which ones are investments to my health in the long run and which ones are gimmicky nonsense. There are quite a few gluten-free processed food companies that really don't cater to living healthily--something that should be priority after a life changing diagnosis. The key is moderation and knowing that not everything needs a gluten-free replacement (Twinkies anyone?)

When dealing with any sort of health issue, breaking the cycle of illness and the root cause makes all the difference. This is the same principle with preventing illness and exaccerbated disease in the first place. It all begins with our forks and knives. I know that when I treat my body well, I can be a confident, healthy, and well balanced being, despite having a life long autoimmune disease and food allergies. Real confidence isn't just a mental state, it's also the ecological balance within. Make the choice to invest in your health and confidence today by starting with your plate.
How do you plan to treat your body well today?

Wednesday, August 1, 2012

Roasted Sunflower Honey Butter


A few years ago, I spent a somewhat awkward year living in Dearborn, Michigan while attending university there. I loved attending classes, seeing the diversity, bustling through the city, and going on impromptu adventures to Detroit. This doesn't sound awkward in the least, but my failing health due to undiagnosed gluten issues complicated everyday activities to the max.

Life in Dearborn became amazing almost overnight after I was finally diagnosed and began my gluten-free journey. One of the first things I learned to love during this time was Sunflower Seed Butter. Granted, I was purchasing it pre-made back then due to being a time starved student. But that didn't remove any of the tasty magical quality of it for me. I remember staring out the kitchen window and childishly dipping my silver spoon time and time again into the sweet seed butter; something I used to do with peanut butter back in my early youth.


Nowadays, I opt for making my own Sunflower Seed buttter for several reasons. I find that many kinds of these butters are produced on shared equipment with soy. After contacting many of these companies, I've been advised that they can't rule out the potential for cross contamination--red flag! Another reason is I love to control how much salt and sugar goes into the butter myself. I am a food purest, and I think most foods contain enough natural taste and sweetness to ward off the addition of processed sugars. While I added honey to my homemade version, it was only a slight drizzle for taste and complemented the warm roasted flavor of the sunflower seeds. To me, food tastes better when I put in the extra effort to make it myself.


Roasted Sunflower Honey Butter

(Naturally free of Gluten, Soy, Peanuts, Dairy, Processed Sugar, & Legumes)

  • 2 cups Raw Sunflower Seeds
  • 4-5 tablespoons Virgin Coconut Oil (I use Artisana brand)
  • 1 tsp Salt, or to taste
  • 1/2 tsp  Vanilla bean paste or Pure Vanilla Extract (McCormick brand is gluten free)
  • A drizzle of Raw Local Honey (to taste, more or less)

Preheat the oven to 350 degrees. Spread raw sunflower seeds evenly over a baking sheet and roast for 10 minutes. Toss them around about halfway through to ensure even roasting.

Place the roasted seeds in a food processor with the salt, vanilla bean paste (scraped from the inside of a vanilla bean) or vanilla extract and 1 tablespoon of coconut oil. Process the mixture for about a minute, then continue to add the rest of the coconut oil while the processor is running. Adding more or less oil to reach the desired consistency might be needed. Add in the drizzle of honey last. Scrape down the sides of the processor a few times to make sure all the seeds are ground down to a creamy butter.
Enjoy with a childish air, and a silver spoon.

~~~~~~~~~~~~~~~~~~~~~~~